Tuto User Guide
Welcome to Tuto—your all-in-one solution designed to help freelance tutors focus on what truly matters: teaching.
1. Introduction
1.1 What is Tuto?
Tuto is a desktop application designed for freelance secondary school tutors in Singapore who teach small classes, usually between one and a few students. It provides an efficient and centralised way to manage student records, track attendance and performance, and handle tuition fee payments.
As a freelance tutor, you often juggle multiple students across different subjects or levels, track lessons, and manage payments using a mix of spreadsheets, WhatsApp chats, and paper notes. These administrative tasks can be time-consuming and take your focus away from teaching.
Tuto was created to simplify this process. It combines the speed and precision of a Command Line Interface (CLI) with the clarity of a Graphical User Interface (GUI), allowing tutors to type quick commands while visualising key information easily. The design assumes users are comfortable typing and prefer fast, keyboard-based interactions instead of navigating complex menus.
With Tuto, tutors can keep all their teaching and administrative information in one place. It is built to reduce workload, improve organisation, and help freelance tutors dedicate more time and attention to their students’ success.
1.2 Main Features
Tuto offers comprehensive features tailored to the needs of freelance tutors:
Student Management
- Add, edit, find, and delete student records with ease
- Each student is automatically assigned a unique 4-digit Student ID (e.g.,
0234,5832) upon creation - Store essential contact information including name, phone numbers, emails, and addresses
- Optionally set an enrollment month to prevent recording attendance, performance, or fees before the student joined
Class Tag Management
- Create and manage class tags to categorize students by the classes they attend (e.g.,
Math_Sec3,JC1_Physics) - Easily assign multiple class tags to students for better organization
- List all existing class tags for quick reference
- Filter students by class tags
Attendance Management
- Mark students as present or absent for each date and class
- View complete attendance history for any student
Performance Management
- Record performance notes for each student based on class and date
- Document achievements, areas for improvement, and progress over time
- View comprehensive performance history to track student development
Fee Management
- Mark monthly tuition payments as paid or unpaid
- Track payment history from enrollment month to current month
- Filter students by payment status for a specific month to easily view who has paid or not paid
2. Getting Started
2.1 Installation
Ensure you have Java
17or above installed in your Computer.
Mac users: Ensure you have the precise JDK version prescribed here.Download the latest
.jarfile from here.Copy the file to the folder you want to use as the home folder for Tuto.
Open a command terminal,
cdinto the folder you put the jar file in, and use thejava -jar tuto.jarcommand to run the application.
A GUI similar to the below should appear in a few seconds. Note how the app contains some sample data.

Type the command in the command box and press Enter to execute it. e.g. typing
helpand pressing Enter will open the help window.
Some example commands you can try:list: Lists all students.add n/John Doe p/98765432 e/johnd@example.com a/John street, block 123, #01-01: Adds a student namedJohn Doeto Tuto.clear: Deletes all data.exit: Exits the app.
Refer to the Command section below for details of all commands supported by Tuto.
2.2 How to Use Tuto Commands
Tuto operates primarily through text-based commands. Before we explore the specific commands in detail in the Commands section, let's familiarize ourselves with the basic components and format of a command.
Important: All command words, parameter prefixes and flags are case-sensitive!
addis different fromADDorAddpn/is different fromPN/orPn/-ais different from-A
2.2.1 Parameter Prefixes
In Tuto, a parameter prefix acts as a delimiter for specifying different types of parameters in commands. Here's a reference table for common parameter prefixes and their corresponding parameters:
| Parameter Prefix | Corresponding Parameter |
|---|---|
n/ | NAME |
s/ | STUDENT_ID |
p/ | PHONE |
e/ | |
a/ | ADDRESS |
m/ | ENROLLED_MONTH or MMYY (month/year) |
t/ | CLASS_TAG |
d/ | DATE (DDMMYYYY format) |
pn/ | PERFORMANCE_NOTE |
2.2.2 Parameters
In Tuto, a parameter represents a placeholder where users input data. Parameters typically follow immediately after their corresponding Parameter Prefixes. Essentially, they are to be supplied by the user.
Note:
- All user inputs including parameters will be trimmed (all leading and trailing whitespaces will be ignored).
- Every parameter (a prefix and its value, e.g. n/John Doe) must be separated from the next prefix by at least one space.
Parameter Details:
| Parameter | Prefix | Description |
|---|---|---|
NAME | n/ | Specifies the name of a student. Requirements: • Names must contain only alphabetic characters, apostrophes ('), hyphens (-), and whitespace. • Names with only whitespace are not allowed. • Must start with a letter. • Maximum length: 100 characters. |
STUDENT_ID | s/ | Specifies the Student ID of a student. Requirements: • IDs are automatically assigned in 4-digit format (e.g., 0234, 5832).• Cannot be blank. |
PHONE | p/ | Specifies the phone number of a student. Requirements: • Phone numbers must contain only numeric digits. • Must be exactly 8 digits long. • Must start with 6, 8, or 9 (Singapore mobile/landline format). |
EMAIL | e/ | Specifies the email address of a student. Requirements: • Format: local-part@domain.• Local part can contain alphanumeric characters and special characters +, _, ., -.• Local part cannot start or end with special characters. • Domain must end with a label at least 2 characters long. • Each domain label must start and end with alphanumeric characters. |
ADDRESS | a/ | Specifies the residential address of a student. Requirements: • Can contain letters, digits, spaces, and the symbols #, ,, -, '.• Cannot be blank. • First character cannot be a whitespace. |
MMYY and ENROLLED_MONTH | m/ | Specifies a month and year for enrollment or payment tracking. Requirements: • Format: Exactly 4 digits in MMYY (e.g., 0825 for August 2025).• MM must be 01-12 (January - December). Leading zero is required (e.g., 08 for August). • YY must be 00–99, interpreted as years 2000–2099. |
CLASS_TAG | t/ | Specifies a class tag to categorize students. Requirements: • Must be 1-30 characters long. • Can only contain alphanumeric characters and underscores ( _).• Tags must exist in the system before assignment to students. |
DATE | d/ | Specifies a date for attendance or performance tracking. Requirements: • Format: DDMMYYYY (e.g., 15092025 for 15 September 2025). |
PERFORMANCE_NOTE | pn/ | Specifies a performance note for a student. Requirements: • Can be any text under 200 characters. |
2.2.3 Command Format
To understand how a full command is interpreted, let's examine the following example.
Example: add n/NAME p/PHONE e/EMAIL a/ADDRESS [m/ENROLLED_MONTH] [t/CLASS_TAG]...
Tip:
Adding class tags before enrolling students makes the process more efficient! Create your class tags first using tag -a t/CLASS_TAG, then you can assign them to students when adding them.
Key Points:
Words in
UPPER_CASEare the parameters to be supplied by the user.
e.g. inadd n/NAME,NAMEis a parameter which can be used asadd n/John Doe.Items in square brackets are optional.
e.gn/NAME [t/CLASS_TAG]can be used asn/John Doe t/Mathor asn/John Doe.Items with
… after them can be used multiple times including zero times.
e.g.[t/CLASS_TAG]…can be used ast/Math,t/Math t/Scienceetc.Parameters can be in any order.
e.g. if the command specifiesn/NAME p/PHONE_NUMBER,p/PHONE_NUMBER n/NAMEis also acceptable.Extraneous parameters for commands that do not take in parameters and flags (such as
help,list,exitandclear) will be ignored.
e.g. if the command specifieshelp 123, it will be interpreted ashelp.If you are using a PDF version of this document, be careful when copying and pasting commands that span multiple lines as space characters surrounding line-breaks may be omitted when copied over to the application.
If you type an extra or unrecognised parameter (or forget to put a space), the app will append it to the previous field’s value instead of treating it as a separate parameter.
General Notes about Tuto Commands:
A command can be categorized into four formats:
COMMAND + FLAG + PARAMETER_PREFIX + PARAMETER
- Example:
tag -a t/Math_Sec3,fee -p s/0001 m/0925,att -p s/0001 d/15092025 t/Math_Sec3 - Common flags include:
-a(add for class tag/ mark as absent),-d(delete),-l(list),-e(edit),-v(view)-p(paid/mark as present),-up(unpaid)-t(tag filter)
- Example:
COMMAND + PARAMETER_PREFIX + PARAMETER
- Example:
add n/John Doe p/98765432 e/johnd@example.com a/John street, block 123, #01-01
- Example:
COMMAND + PARAMETER
- Example:
find John David
- Example:
COMMAND
- Example:
list,help,exit,clear
- Example:
3. Commands
All deletion commands (
delete, clear, tag -d, att -d, perf -d) are irreversible and will permanently delete data. Make sure you have backed up any important information before using any deletion command in this application.
3.1 Student Management
The Student Management commands allow you to add, edit, find, delete, and list students in the address book.
Each student added is automatically assigned a unique Student ID (in 4-digit format, e.g. 0234, 5832), which is used in other commands such as fees, attendance, and performance tracking.
Overview of Student Management Commands
| Command | Description |
|---|---|
add n/NAME p/PHONE e/EMAIL a/ADDRESS [m/ENROLLED_MONTH] [t/CLASS_TAG]... | Add a new student to the address book |
edit s/STUDENT_ID [n/NAME] [p/PHONE] [e/EMAIL] [a/ADDRESS] [t/CLASS_TAG]... | Edit details of an existing student |
find KEYWORD [MORE_KEYWORDS] | Find students by name |
delete s/STUDENT_ID | Delete a student using their Student ID |
list | List all students |
clear | Clear all student entries and class tags |
3.1.1 Adding a student : add
Adds a new student to the address book.
Format: add n/NAME p/PHONE e/EMAIL a/ADDRESS [m/ENROLLED_MONTH] [t/CLASS_TAG]...
Command Details and Constraints:
- Creates a new student record with the specified name, phone number, email, and address.
- The
ENROLLED_MONTHandCLASS_TAGfields are optional. - If
ENROLLED_MONTHis not provided, it automatically defaults to the current month, and the student is assumed to be enrolled on the first day of that month. - The
ENROLLED_MONTHcannot be edited after creation. - The student is automatically assigned a unique 4-digit
STUDENT_IDupon creation. - A student can have multiple class tags or none at all.
- Tags must exist in the system. If a specified tag does not exist, the command will be rejected.
- The system detects duplicate students based on both name and phone number. Names are case-insensitive and whitespace-normalized (extra spaces are ignored). If a student with the same name and phone number already exists, the command will be rejected. This allows students with the same phone number if their names differ (e.g., siblings sharing a parent’s contact).
You can add multiple tags by specifying t/CLASS_TAG1 t/CLASS_TAG2 ....
A student can also be added without any tags.
Examples:
add n/John Doe p/98765432 m/0825 e/johnd@example.com a/John street, block 123, #01-01— adds a student with no tags.Expected output:
New student added: John Doe; Phone: 98765432; Email: johnd@example.com; Address: John street, block 123, #01-01; Tags: -add n/Betsy Crowe t/Math_Sec3 e/betsycrowe@example.com a/Clementi p/87654321 t/English_J1— adds a student with two tags:Math_Sec3andEnglish_J1.Expected output:
New student added: Betsy Crowe; Phone: 87654321; Email: betsycrowe@example.com; Address: Clementi; Tags: [Math_Sec3][English_J1]
3.1.2 Editing a student : edit
Edits the details of an existing student in the address book using their Student ID.
Format: edit s/STUDENT_ID [n/NAME] [p/PHONE] [e/EMAIL] [a/ADDRESS] [t/CLASS_TAG]...
Command Details and Constraints:
- Updates the student identified by the given
STUDENT_ID. - At least one optional field must be provided.
- Existing details will be replaced by the new input values.
- When editing class tags:
- To edit tags: specify
t/CLASS_TAG1 t/CLASS_TAG2 ...(existing tags replaced with new tags). - To clear all tags: use
t/with no tags provided.
- To edit tags: specify
- After editing, the system checks for duplicates based on both name and phone number. Names are case-insensitive and whitespace-normalized. If the updated details would create a duplicate, the command will be rejected.
Examples:
edit s/0006 p/91234567 e/johndoe@example.com— edits the phone number and email of the student with ID2042.Expected output:
Edited student: John Doe; Phone: 91234567; Email: johndoe@example.com; Address: John street, block 123, #01-01; Tags: -edit s/0006 n/Betsy Crower t/Math_Sec3 t/English_J1— changes the name of student2042and updates the student’s tags toMath_Sec3andEnglish_J1.Expected output:
Edited student: Betsy Crower; Phone: 91234567; Email: johndoe@example.com; Address: John street, block 123, #01-01; Tags: [Math_Sec3][English_J1]edit s/0006 t/— clears all tags.Expected output:
Edited student: Betsy Crower; Phone: 91234567; Email: johndoe@example.com; Address: John street, block 123, #01-01; Tags: -
3.1.3 Finding students : find
Finds students whose names contain any of the given keywords.
Format: find KEYWORD [MORE_KEYWORDS]
Command Details and Constraints:
- The search is case-insensitive (e.g.
hansmatchesHans). - The order of keywords does not matter (e.g.
Hans BomatchesBo Hans). - Only full words are matched (e.g.
Hanwill not matchHans). - Students matching at least one keyword will be displayed in the GUI.
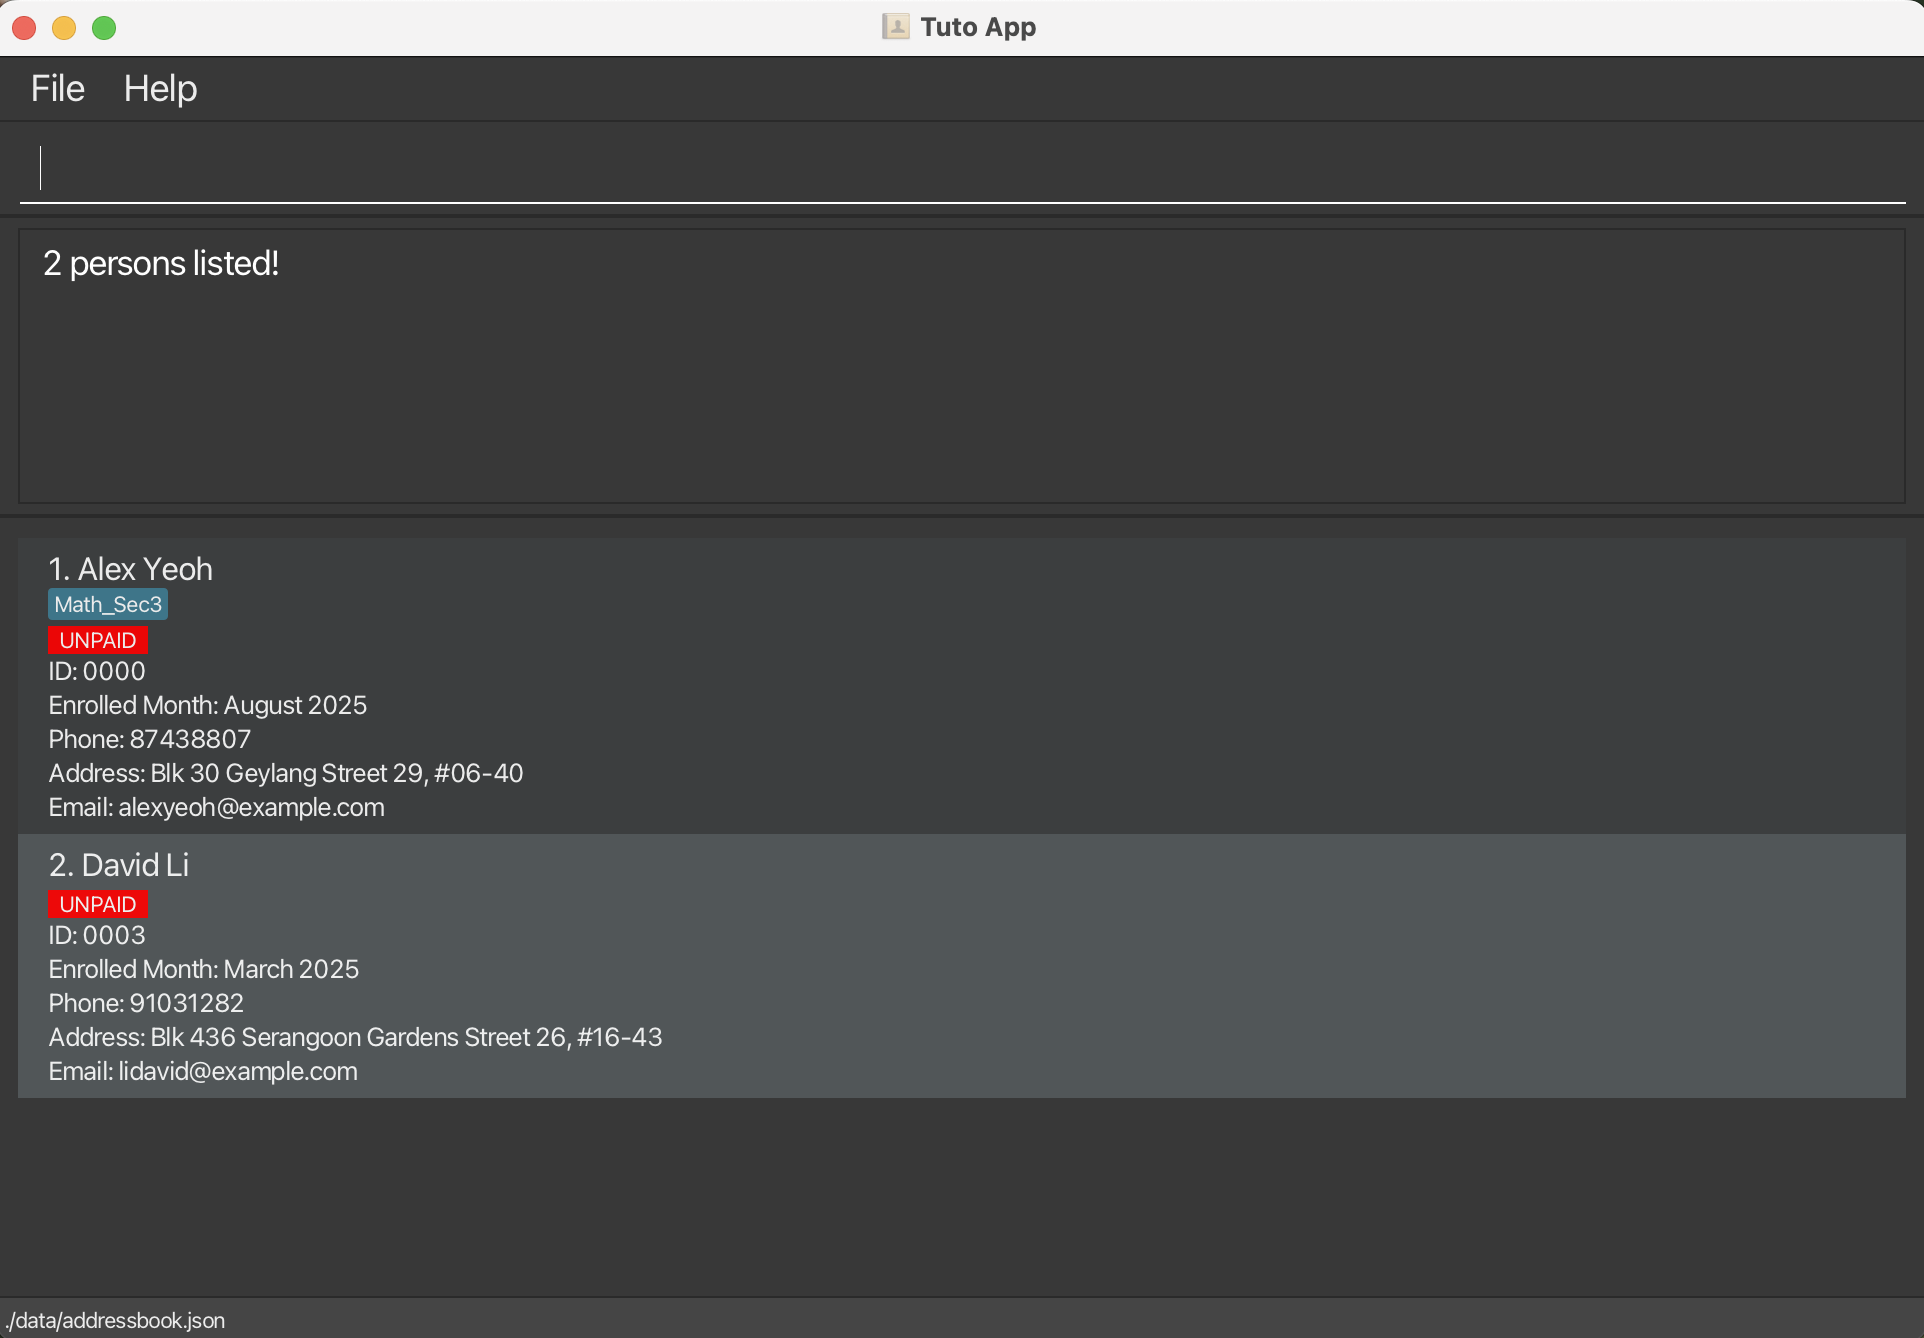
Examples:
find alex david— displays all students with names containing “Alex” or “David”.Expected output (if 2 students found):
3.1.4 Deleting a student : delete
Deletes a specified student from the address book using their Student ID.
Format: delete s/STUDENT_ID
Command Details and Constraints:
- Removes the student with the matching Student ID from the address book.
- The Student ID must correspond to an existing student.
Examples:
delete s/0007— deletes the student with ID0007.Expected output:
Deleted student: Betsy Crowe; Phone: 1234567; Email: betsycrowe@example.com; Address: Newgate Prison; Tags: [Math_Sec3][English_J1]
3.1.5 Listing all students : list
Displays all students currently stored in the address book.
Format: list
Command Details and Constraints:
- Shows a list of all students in the GUI panel.
- Each student entry displays their name, Student ID, enrolled month, phone number, email address, address, tags, and current month payment status.
- The list updates automatically whenever students are added, edited, or deleted.
Expected output:
Listed all students
3.1.6 Clearing all entries : clear
Clears all student records and class tags from the address book.
Format: clear
Command Details and Constraints:
- Removes all student entries and class tags permanently from the address book.
- This action cannot be undone.
Expected output:
All students and class tags have been cleared!
3.2 Class Tag Management
The Class Tag commands allow you to create, delete, and list class tags in the system.
Class tags are useful for organizing students by the classes they attend (e.g. Math_Sec3, JC1_Physics).
Overview of Class Tag Management Commands
| Command | Description |
|---|---|
tag -a t/CLASS_TAG | Add a new class tag |
tag -d t/CLASS_TAG | Delete an existing class tag |
tag -l | List all existing class tags |
3.2.1 Adding a class tag : tag -a
Adds a new class tag to the system. This allows you to categorize students by the classes they attend.
Format: tag -a t/CLASS_TAG
Command Details and Constraints:
- This command creates a new class tag with the specified
CLASS_TAG. - If a tag with the same name (case-insensitive) already exists, the command will not create a duplicate and will inform the user.
- Tag names must be 1-30 characters long and can only contain alphanumeric characters and underscores (
_). Spaces or other special characters are not allowed. - Tag names are case-insensitive when checking for duplicates, but the original casing is preserved when added.
- Tag names are also character sensitive (eg.
MathSec3andMath_Sec3are considered different tags).
Examples:
tag -a t/Math_Sec3— Adds a class tag namedMath_Sec3.Expected output:
New class tag added: Math_Sec3tag -a t/JC1_Physics— Adds a class tag namedJC1_Physics.Expected output:
New class tag added: JC1_Physics
3.2.2 Deleting a class tag : tag -d
Deletes an existing class tag from the system.
Format: tag -d t/CLASS_TAG
Command Details and Constraints:
- This command removes the class tag with the specified
CLASS_TAGfrom the system. - If the specified tag does not exist, the command will inform the user.
- If the tag is currently assigned to one or more students, the command will not delete the tag and will inform the user to first remove the tag from all students.
- Tag name matching is case-insensitive.
Examples:
tag -d t/Math_Sec3— Deletes the class tag namedMath_Sec3
Expected output:
Tag deleted: Math_Sec3
tag -d t/jc1_physics— Deletes the class tag namedJC1_Physics, regardless of case (if JC1_Physics exists in this casing).
Expected output:
Tag deleted: JC1_Physics
3.2.3 Listing all class tags : tag -l
Shows a list of all class tags currently created in the address book.
Format: tag -l
Examples:
tag -l: If class tagsJC1_PhysicsandMath_Sec3exist in the system.
Expected output:
Listed all class tags:
1. JC1_Physics
2. Math_Sec3
tag -l: If no class tags exist in the system.
Expected output:
No class tags found. You can add one using the 'tag -a' command.
3.3 Fee Management
The Fee Management Commands allows you to record, update, and view student payment statuses.
This helps tutors and administrators track monthly tuition fee payments efficiently and keep student records up to date.
Overview of fee commands
| Command | Description |
|---|---|
fee -p s/STUDENT_ID m/MMYY | Marks a student as PAID for a specified month |
fee -up s/STUDENT_ID m/MMYY | Marks a student as UNPAID for a specified month |
fee -v s/STUDENT_ID [m/MMYY] | Views a student’s payment history |
The fee tag shows PAID only if every month from the student’s enrolled month to the current month has been paid. Otherwise, it shows UNPAID indicates the student has outstanding fees.
3.3.1 Marking a student as paid: fee -p
Marks a student’s payment status as PAID for a specific month.
Format: fee -p s/STUDENT_ID m/MMYY
Command Details and Constraints:
- Tutors can only mark payments for months between the student’s enrollment month and the current month (inclusive).
- Payments must follow chronological order — earlier months must be settled before marking later ones.
- Payments before enrollment or in future months are not allowed.
- If a month is already marked as PAID, duplicate payment attempts will be rejected.
Examples:
fee -p s/0001 m/0925— marks student0001(Bernice Yu) as PAID for September 2025.Expected output:
Bernice Yu has been successfully marked as Paid for September 2025.
3.3.2 Marking a student as unpaid: fee -up
Marks a student’s payment status as UNPAID for a specific month.
Use this command for corrections or when a payment was mistakenly marked as PAID.
Format:
fee -up s/STUDENT_ID m/MMYY
Command Details and Constraints:
- Tutors can only mark payments for months between the student’s enrollment month and the current month (inclusive).
- If the month is already marked as UNPAID, the command will be rejected.
- Payments before enrollment or in future months are not allowed.
- Once corrected, the tutor must re-mark earlier unpaid months before recording new payments for later months.
Examples:
fee -up s/0001 m/0925— marks student0001(Bernice Yu) as UNPAID for September 2025.Expected output:
Bernice Yu has been successfully marked as Unpaid for September 2025.
3.3.3 Viewing a student’s payment history: fee -v
Displays a student’s payment history from a specified starting month up to the current month, with records shown from newest to oldest.
Format:
fee -v s/STUDENT_ID [m/MMYY]
Command Details and Constraints:
- Tutors can view payment history starting from any valid month between the student’s enrollment month and the current month (inclusive).
- If the starting month is not provided, or it precedes the student’s enrollment month, the history will automatically start from the enrollment month.
- If the starting month is after the current month, the command will return an error message.
- The displayed history includes both explicitly marked months (via
fee -porfee -up) and default UNPAID months that were not manually recorded.
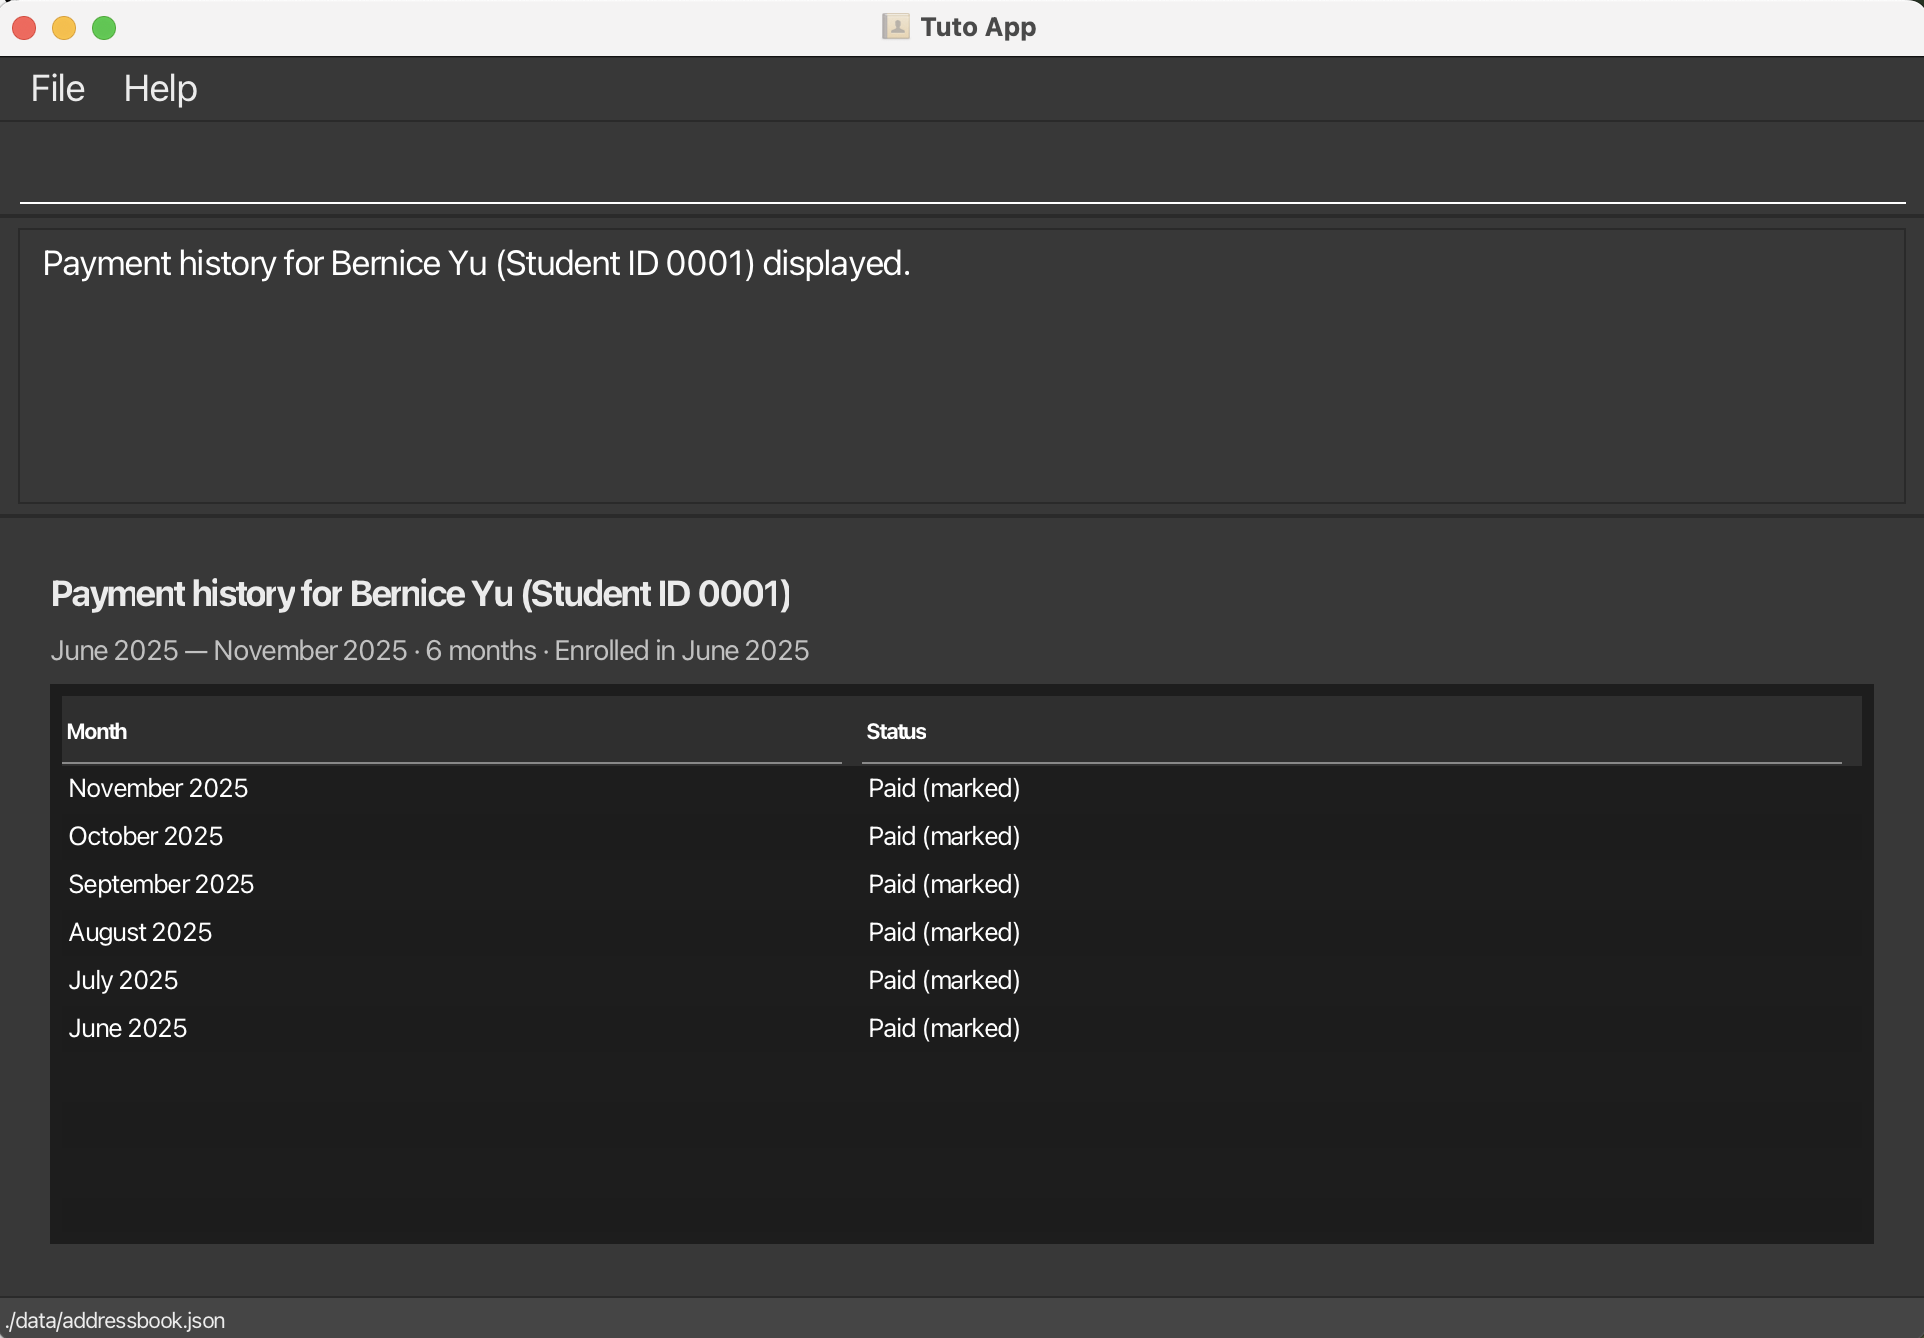
Examples:
fee -v s/0001— shows payment history for student0001from their enrollment month to the current month.Expected Output:
fee -v s/0001 m/0725— shows payment history starting July 2025 to the current month.
Expected Output:

Interpreting the results:
marked— the payment was explicitly set viafee -porfee -up.default— the month had no explicit record and is assumed UNPAID.
3.4 Attendance management
The att command family allows you to record, update, and view student attendance.
Each attendance record is tied to both a date and a class tag, allowing tutors to manage students who attend multiple classes efficiently.
Overview of Attendance Management Commands
| Command | Description |
|---|---|
att -p s/STUDENT_ID d/DATE t/CLASS_TAG | Mark a student as present for a given date and class tag |
att -a s/STUDENT_ID d/DATE t/CLASS_TAG | Mark a student as absent for a given date and class tag or undoes a marked attendance |
att -d s/STUDENT_ID d/DATE t/CLASS_TAG | Delete an attendance record for a student on a specific date and class |
att -v s/STUDENT_ID | View a student's attendance records |
3.4.1 Marking a student as present : att -p
Marks a student's attendance as PRESENT for a specific date and class.
Format: att -p s/STUDENT_ID d/DATE t/CLASS_TAG
Command Details and Constraints:
- This command records that a student attended a specific class on a specific date.
- The student must have the specified class tag assigned to them, or have an existing attendance record for that class and date (to allow editing past records even if the student has left the class).
- If the student doesn't have the tag and no attendance record exists, the command will be rejected with an error message.
- The date must be in
DDMMYYYYformat (e.g.,15092025for 15 September 2025).
Examples:
att -p s/0001 d/15092025 t/Math— Marks student0001(Bernice Yu) as present for 15 September 2025 in Math class.Expected output:
Marked Bernice Yu as present on 15-09-2025 for class Math.
3.4.2 Marking a student as absent : att -a
Marks a student's attendance as ABSENT for a specific date and class. Use this to record absences or to undo a previously marked PRESENT attendance by changing it to ABSENT.
Format: att -a s/STUDENT_ID d/DATE t/CLASS_TAG
Command Details and Constraints:
- This command records that a student was absent from a specific class on a specific date.
- This command can also be used to undo a PRESENT attendance by changing it to ABSENT.
- The student must have the specified class tag assigned to them, or have an existing attendance record for that class and date (to allow editing past records even if the student has left the class).
- If the student doesn't have the tag and no attendance record exists, the command will be rejected with an error message.
- The date must be in
DDMMYYYYformat (e.g.,15092025for 15 September 2025).
Examples:
att -a s/0001 d/15092025 t/Math— Marks student0001(Bernice Yu) as absent for 15 September 2025 in Math class.Expected output:
Marked Bernice Yu as absent on 15-09-2025 for class Math.
3.4.3 Deleting an attendance record : att -d
Deletes an attendance record for a student on a specific date and class. Use this to remove attendance records that were marked by mistake or are no longer needed.
Format: att -d s/STUDENT_ID d/DATE t/CLASS_TAG
Command Details and Constraints:
- This command removes an existing attendance record for a student.
- An attendance record must exist for the given date and class for the deletion to succeed.
- The student does not need to currently have the specified class tag assigned. This allows you to delete historical attendance records even after a student has left a class and the tag has been removed.
- The class tag does not need to exist in the system anymore. This allows you to clean up orphaned attendance records after deleting a class tag.
- The date must be in
DDMMYYYYformat (e.g.,15092025for 15 September 2025).
Examples:
att -d s/0001 d/15092025 t/Math— Deletes the attendance record for student0001(Bernice Yu) on 15 September 2025 in Math class.Expected output:
Deleted attendance for: Bernice Yu on 15-09-2025 for class Mathatt -d s/0003 d/25082025 t/Science— Attempts to delete an attendance record that doesn't exist.Expected output:
No attendance record found for David Li on 25-08-2025 for class Science
3.4.4 Viewing a student's attendance records : att -v
Displays all attendance records for a specific student across all their classes.
Format: att -v s/STUDENT_ID
Command Details and Constraints:
- This command shows all attendance records for a student, organized by date and class.
- If no attendance records exist for the student, a message will be displayed indicating no records were found.
Examples:
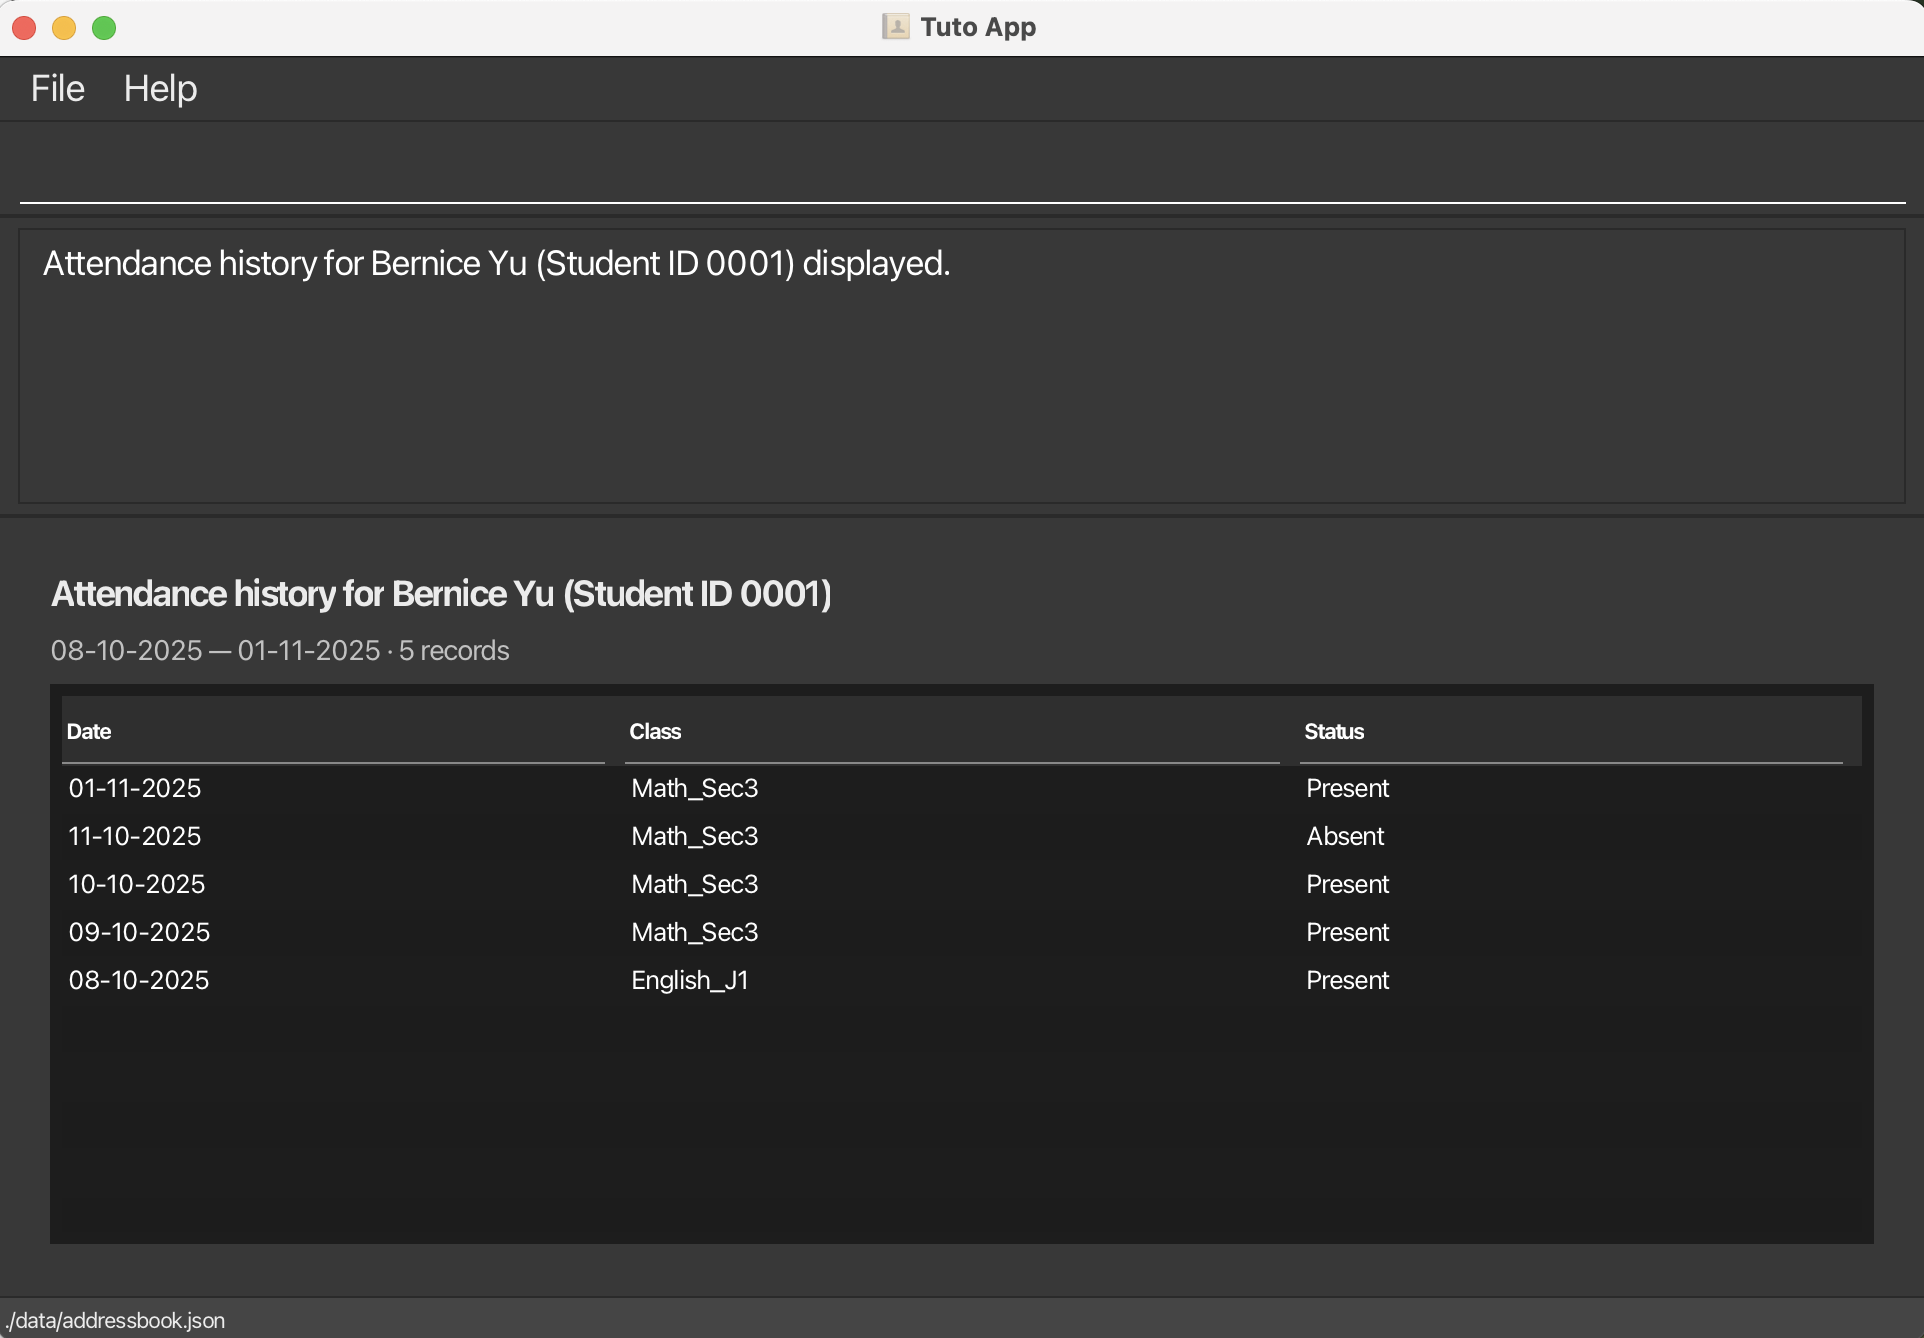
att -v s/0001— Shows all attendance records for student0001(Bernice Yu).Expected output:
att -v s/0003— If no attendance record for student0003(David Li).Expected output:
No attendance record found for: David Li
3.5 Performance Management
The perf command family allows you to track students' performance in class by adding performance notes.
Each performance note is tied to both a date and a class tag, allowing tutors to document specific achievements or areas for improvement for each student.
Overview of perf commands
| Command | Description |
|---|---|
perf -a s/STUDENT_ID d/DATE t/CLASS_TAG pn/PERFORMANCE_NOTE | Add performance data for a student |
perf -v s/STUDENT_ID | View performance data for a student |
perf -e s/STUDENT_ID d/DATE t/CLASS_TAG pn/PERFORMANCE_NOTE | Edit existing performance data for a student |
perf -d s/STUDENT_ID d/DATE t/CLASS_TAG | Delete performance data for a student |
3.5.1 Adding a performance note for a student : perf -a
Adds a performance note for a student in a specific class on a specific date.
Format: perf -a s/STUDENT_ID d/DATE t/CLASS_TAG pn/PERFORMANCE_NOTE
Command Details and Constraints:
- Adds a performance note for the student identified by the given
STUDENT_ID. - The
DATEmust not be before the student's enrollment date and cannot be a future date. - The
CLASS_TAGmust correspond to an existing class tag assigned to the student. - The
PERFORMANCE_NOTEcan be any text under 200 characters. - If a performance note already exists for the same date and class tag, the command will reject the addition and show an error message.
Examples:
perf -a s/0001 d/18092025 t/Math_Sec3 pn/Scored 85% on mock testExpected output:
Performance note successfully added for John Tan in Math_Sec3 on 18-09-2025.
3.5.2 Editing a performance note for a student : perf -e
Edits an existing performance note for a student.
Format: perf -e s/STUDENT_ID d/DATE t/CLASS_TAG pn/PERFORMANCE_NOTE
Command Details and Constraints:
- Edits the performance note for the student identified by the given
STUDENT_ID,DATE, andCLASS_TAG. - The
PERFORMANCE_NOTEcan be any text under 200 characters. - If no performance note exists for the specified date and class tag, the command will reject the edit and show an error message.
Examples:
perf -e s/0001 d/18092025 t/Math_Sec3 pn/Scored 90% on mock test after re-evaluationExpected output:
Performance note for John Tan in Math_Sec3 on 18-09-2025 successfully edited.
3.5.3 Deleting a performance note for a student : perf -d
Deletes a performance note for a student.
Format: perf -d s/STUDENT_ID d/DATE t/CLASS_TAG
Command Details and Constraints:
- Deletes the performance note for the student identified by the given
STUDENT_ID,DATE, andCLASS_TAG. - If no performance note exists for the specified date and class tag, the command will reject the deletion and show an error message.
Examples:
perf -d s/0001 d/18092025 t/Math_Sec3Expected output:
Performance note for John Tan in Math_Sec3 on 18-09-2025 successfully deleted.
3.5.4 Viewing performance notes for a student : perf -v
Displays all performance notes for a student.
Format: perf -v s/STUDENT_ID
Command Details and Constraints:
- Displays all performance notes for the student identified by the given
STUDENT_ID. - If no performance notes exist for the student, a message will be displayed indicating no notes were found.
- Performance notes are displayed in chronological order based on the date.
- Each note shows the date, class tag, and the performance note content.
Examples:
perf -v s/0001Expected output:

3.6 Filter students: filter
The filter command allows you to quickly find students based on specific criteria such as payment status or class tags.
This is useful for tutors and administrators who want to check which students
have paid or are unpaid for a given month, or to focus on a specific class group.
Overview of Filter Commands
Filtering supports three main types of criteria:
| Command | Description |
|---|---|
filter -p m/MMYY | Show students marked as PAID for a specific month |
filter -up m/MMYY | Show students marked (or defaulted) as UNPAID for a specific month |
filter -t t/CLASS_TAG | Show students belonging to a particular CLASS_TAG |
You can only use one flag per command. Each filter updates the main student list view to display only matching entries.
3.6.1 Filter by paid status : filter -p
Shows all students whose payment status is PAID for a given month. You can only filter up to the current month (future months are not allowed).
Format: filter -p m/MMYY
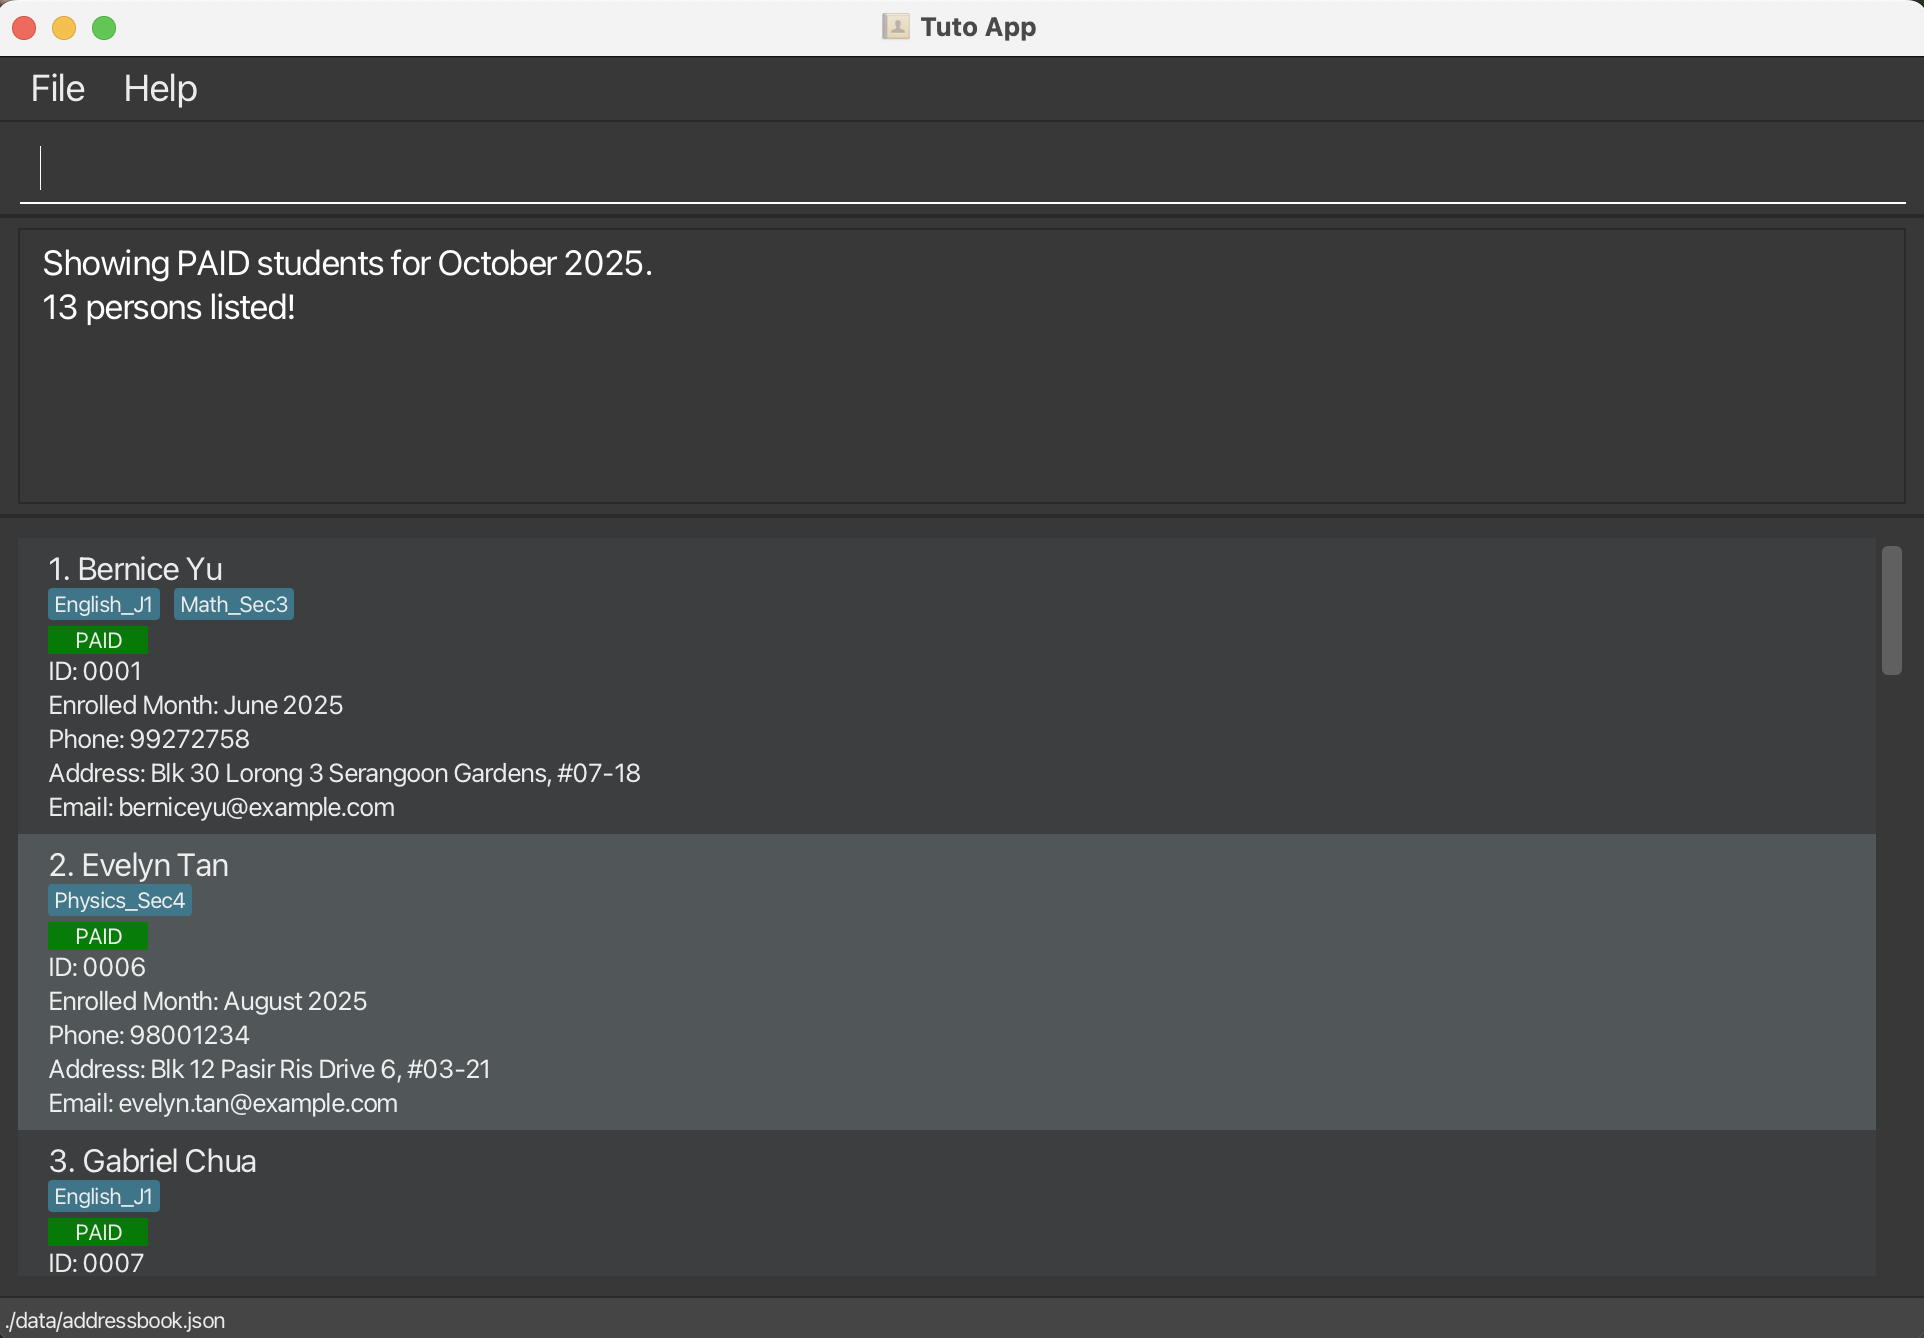
Examples:
filter -p m/1025Expected Output:
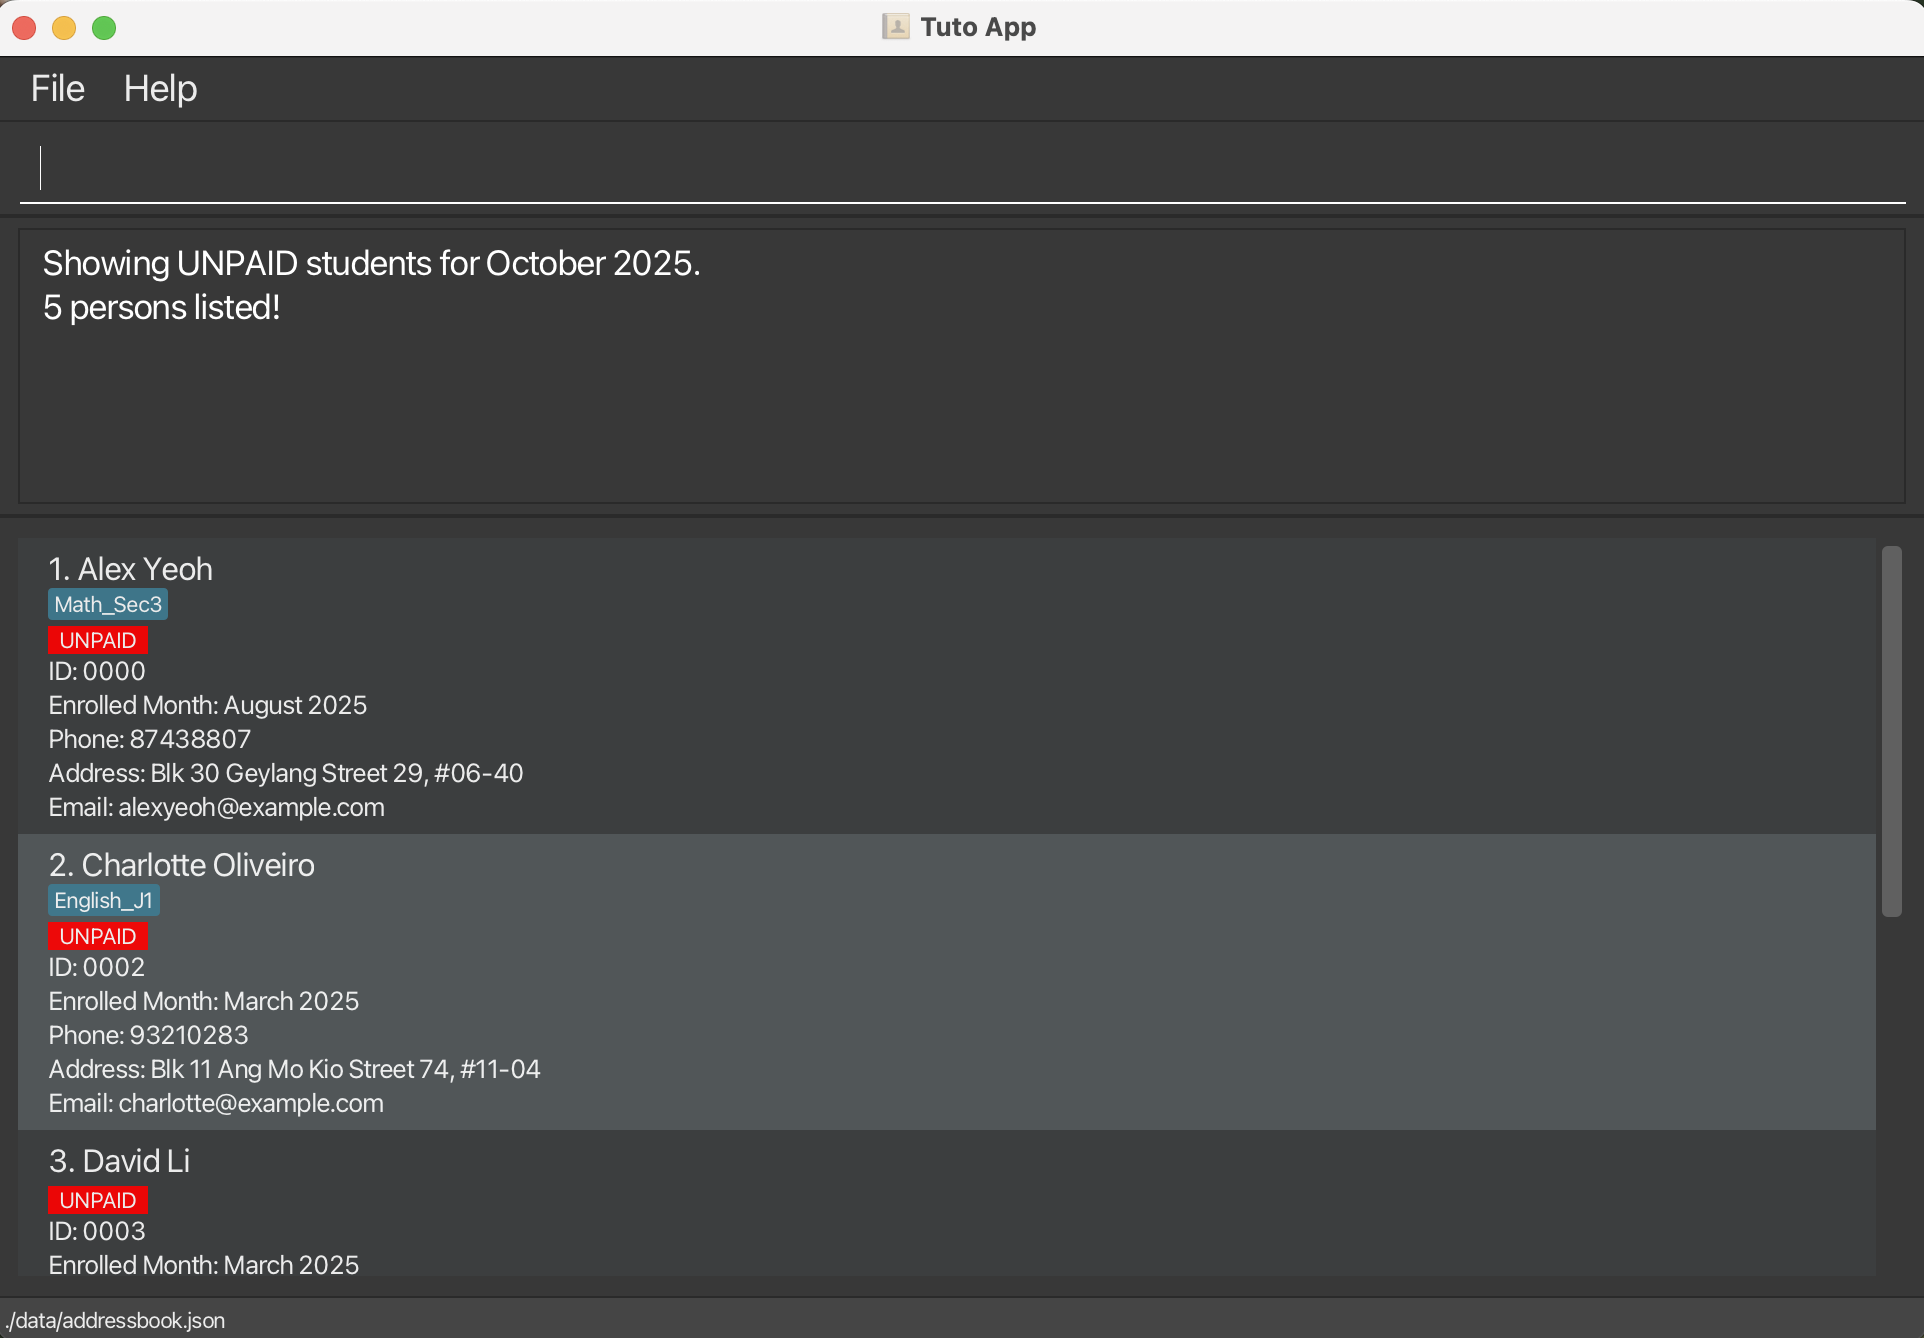
3.6.2 Filter by unpaid status : filter -up
Shows all students whose payment status is UNPAID for a given month. You can only filter up to the current month (future months are not allowed).
Format: filter -up m/MMYY
Examples:
filter -up m/1025Expected Output:
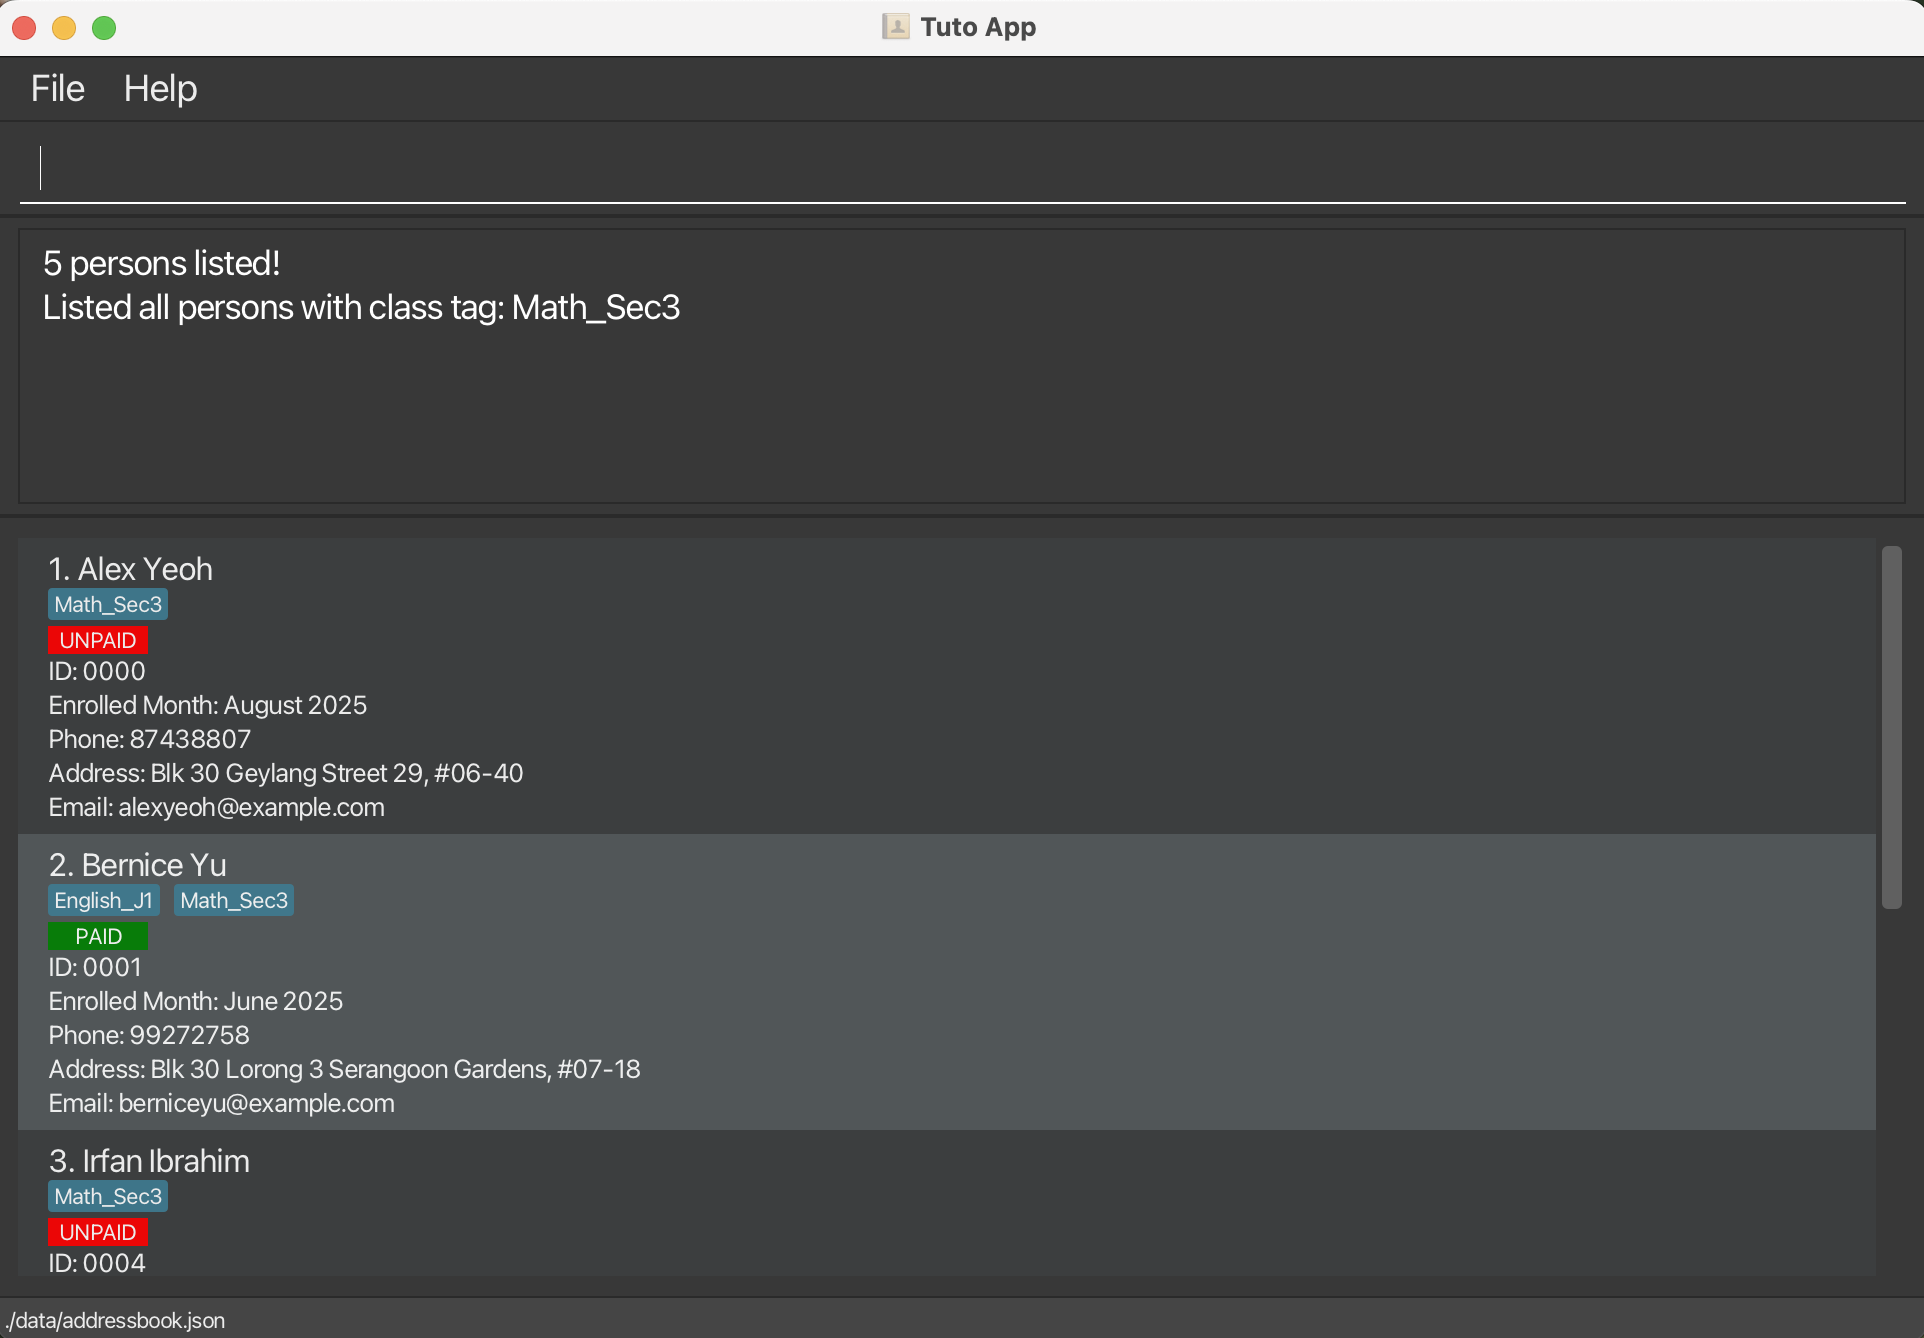
3.6.3 Filter by class tag : filter -t
Filters the main list to show only persons who are assigned the specified class tag.
Format: filter -t t/CLASS_TAG
Command Details and Constraints:
- The class tag must already exist in the system.
- Tag name matching is case-insensitive.
Examples:
filter -t t/Math_Sec3— Shows only students who have theMath_Sec3tag.
Expected output:
3.7 Viewing help : help
Shows a message explaining how to access the help page.

Format: help
3.8 Exiting the program : exit
Exits the program.
Format: exit
3.9 Saving the data
AddressBook data are saved in the hard disk automatically after any command that changes the data. There is no need to save manually.
3.10 Editing the data file
AddressBook data are saved automatically as a JSON file [JAR file location]/data/addressbook.json. Advanced users are welcome to update data directly by editing that data file.
Notes:
- When editing the class tags, ensure the class tags are in valid format (1-30 characters long and can only contain alphanumeric characters and underscores, no extra spaces before or after the class tag).
- When editing class tags assigned to a student, ensure that the class tags exist in the system (i.e., in the
classTagslist in the JSON file).
Caution:
If your changes to the data file makes its format invalid, AddressBook will discard all data and start with an empty data file at the next run. Hence, it is recommended to take a backup of the file before editing it.
Furthermore, certain edits can cause the AddressBook to behave in unexpected ways (e.g., if a value entered is outside the acceptable range). Therefore, edit the data file only if you are confident that you can update it correctly.
FAQ
Q: How do I transfer my data to another Computer?
A: Install the app in the other computer and overwrite the empty data file it creates with the file that contains the data of your previous AddressBook home folder.
Known issues
- When using multiple screens, if you move the application to a secondary screen, and later switch to using only the primary screen, the GUI will open off-screen. The remedy is to delete the
preferences.jsonfile created by the application before running the application again. - If you minimize the Help Window and then run the
helpcommand (or use theHelpmenu, or the keyboard shortcutF1) again, the original Help Window will remain minimized, and no new Help Window will appear. The remedy is to manually restore the minimized Help Window.
Command summary
| Action | Format, Examples |
|---|---|
| Add | add n/NAME p/PHONE e/EMAIL a/ADDRESS [m/ENROLLED_MONTH] [t/CLASS_TAG]… e.g., add n/James Ho p/22224444 e/jamesho@example.com a/123, Clementi Rd, 1234665 m/0825 t/Math t/Science |
| Clear | clear |
| Delete | delete s/STUDENT_IDe.g., delete s/0230 |
| Edit | edit s/STUDENT_ID [n/NAME] [p/PHONE_NUMBER] [e/EMAIL] [a/ADDRESS] [t/TAG]…e.g., edit s/1234 n/James Lee e/jameslee@example.com |
| Find | find KEYWORD [MORE_KEYWORDS]e.g., find James Jake |
| List | list |
| Help | help |
| Class Tag (ADD) | tag -a t/CLASS_TAGe.g., tag -a t/Math_Sec3 |
| Class Tag (DELETE) | tag -d t/CLASS_TAGe.g., tag -d t/Math_Sec3 |
| Class Tag (LIST) | tag -le.g., tag -l |
| Mark as PAID | fee -p s/STUDENT_ID m/MMYY e.g., fee -p s/0001 m/0925 |
| Mark as UNPAID | fee -up s/STUDENT_ID m/MMYY e.g., fee -up s/0001 m/0925 |
| View payment history | fee -v s/STUDENT_ID [m/MMYY] e.g., fee -v s/0001 m/0525 |
| Mark as PRESENT | att -p s/STUDENT_ID d/DDMMYYYY t/CLASS_TAG e.g., att -p s/0001 d/15092025 t/Math |
| Mark as ABSENT | att -a s/STUDENT_ID d/DDMMYYYY t/CLASS_TAG e.g., att -a s/0001 d/15092025 t/Math |
| Delete attendance | att -d s/STUDENT_ID d/DDMMYYYY t/CLASS_TAG e.g., att -d s/0001 d/15092025 t/Math |
| View attendance | att -v s/STUDENT_ID e.g., att -v s/0001 |
| Filter by PAID status | filter -p m/MMYY e.g., filter -p m/1025 |
| Filter by UNPAID status | filter -up m/MMYY e.g., filter -up m/1025 |
| Filter by class tag | filter -t t/CLASS_TAG e.g., filter -t t/Math_Sec3 |
| Add performance note | perf -a s/STUDENT_ID d/DATE t/CLASS_TAG pn/PERFORMANCE_NOTE e.g., perf -a s/0001 d/18092025 t/Math_Sec3 pn/Scored 85% on mock test |
| View performance notes | perf -v s/STUDENT_ID e.g., perf -v s/0001 |
| Edit performance note | perf -e s/STUDENT_ID d/DATE t/CLASS_TAG pn/PERFORMANCE_NOTE e.g., perf -e s/0001 d/18092025 t/Math_Sec3 pn/Scored 90% on mock test after re-evaluation |
| Delete performance note | perf -d s/STUDENT_ID d/DATE t/CLASS_TAG e.g., perf -d s/0001 d/18092025 t/Math_Sec3 |